Managing KMIP Clients
In this tutorial you will learn how to create and manage KMIP clients.
Background
Access to the KMIP Server is controlled via mutual TLS (mTLS). Only registered KMIP clients can access the KMIP Server (and through it, the HSM Partition).
In mTLS, both the client and the server have a private key with which they prove their identity. They also have each other's certificates, which pins the expected counterpart of the communication.
The communication between the KMIP Server and the HSM is secured using the HSM-native, custom protocol. It is authenticated using the Partition name and Permanent Secret.

Every KMIP client is identified by the Subject Common Name (CN) of its client certificate. The name can be chosen freely when the certificate is issued. The CN also identifies the client in the KMIP Server logs, for example:
INFO [26E0F496-1:admin] op Certificate from 10.28.3.135:40236 dn: CN=admin, OU=Securosys Key Manager KMIP, O=Securosys SA, C=CH
KMIP clients are managed in the Key Manager UI under Add-ons > KMIP Server > Clients.
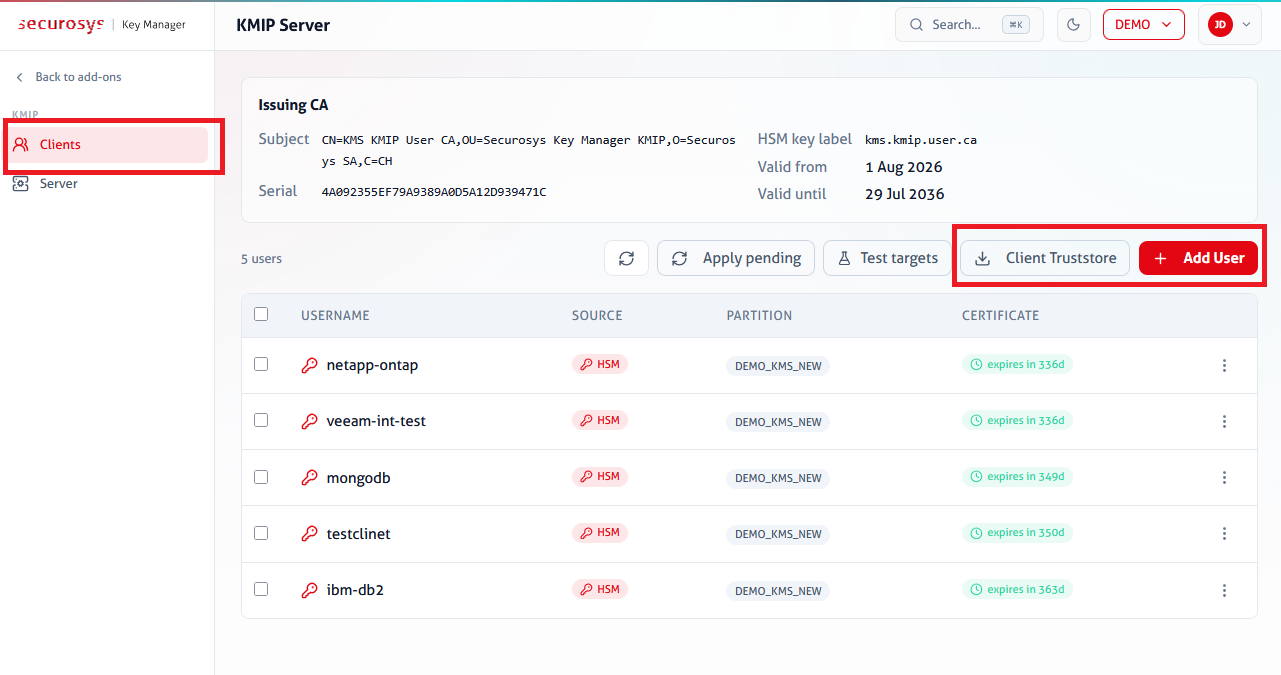
Add a KMIP Client
Onboarding a client application works as follows:
- Create the KMIP client.
- Download the client credentials (keystore and truststore).
- Configure the client application to connect to the KMIP Server.
Step 1: Create KMIP Client
Go to Add-ons > KMIP Server > Clients and click Add User.
The wizard offers three onboarding modes. They differ in who generates the client key pair, where the private key lives, and whether the KMIP Server must be restarted. If you are unsure, choose Option 1.
| Option 1: Generate HSM key | Option 2: Sign a request (CSR) | Option 3: Import certificate | |
|---|---|---|---|
| Key pair origin | HSM generates a fresh key pair | Existing key pair (e.g., locally generated by the app) | Existing key pair |
| Certificate origin | Issued by KMIP User CA | Issued by KMIP User CA | Issued by separate CA |
| KMIP client username | CN chosen in wizard | CN from CSR | CN from certificate |
| KMIP Server restart required | No | No | Yes |
| Notes | Optionally import the issuing CA certificate to trust (instead of trusting the leaf certificate). |
Follow the wizard to create a new KMIP client. If you choose Option 3, restart the KMIP Server to make sure that it reloads the updated client list.
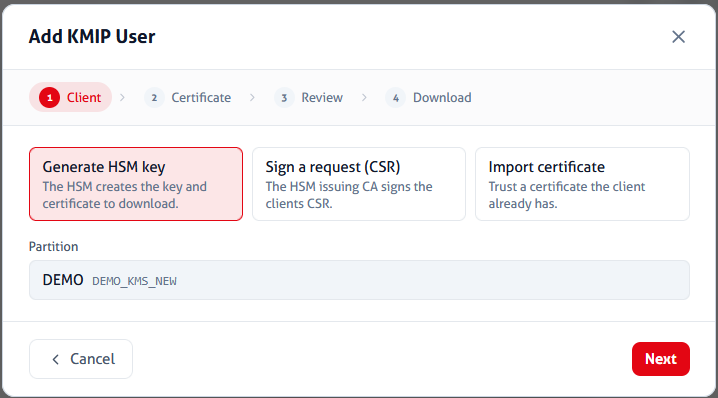
Step 2: Download Client Credentials
After you have created the KMIP client, download the client credentials. They consist of:
- Client keystore: The client private key and client certificate. Used to authenticate to the KMIP Server.
- Client truststore: The KMIP Server's certificate. Used to verify the client is talking to the correct server.
The client keystore only contains the client key if you generated a fresh key in the HSM (Option 1). Otherwise, it only contains the client certificate.
Click ⋮ > Download credentials:
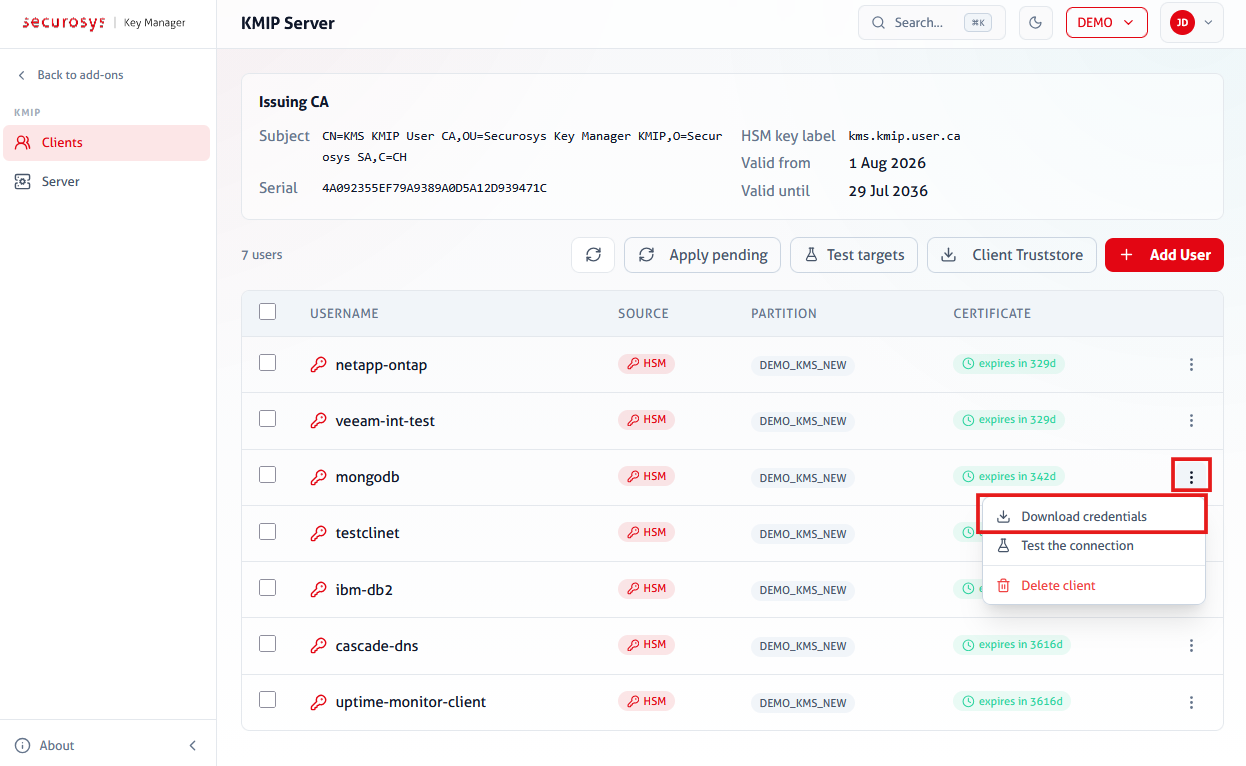
Then choose the desired format:
- PEM: Creates a ZIP file with
client-cert.pem,client-key.pem,client-combined.pem(concatenation of cert and key), andkmip-server-cert.pem. No password. - PKCS#12 (keystore + truststore): Creates a ZIP file with
client-keystore.p12,client-truststore.p12. Password-protected (same password for both files). - PKCS#12 (single bundle): Creates a
client.p12that includes all three (client key, client certificate, server certificate). Password-protected.
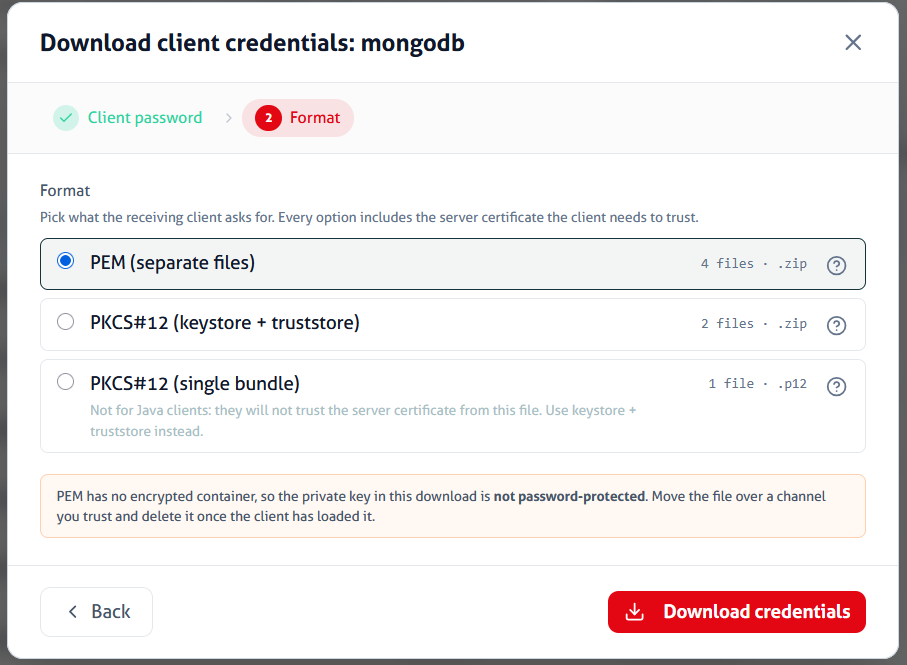
Step 3: Connect Application
Configure your client application to use the client keystore and truststore. Also configure the KMIP Server URL and port.
Your application can now connect to the KMIP Server. For more details, please see the application-specific documentation.
Delete KMIP Clients
To delete a KMIP client, click ⋮ > Delete client for the respective client. Confirm the deletion by typing the username. The client loses access immediately; no KMIP Server restart is needed.
The KMIP User CA
The Key Manager automatically provisions a dedicated issuing CA for KMIP client
certificates, the KMIP User CA.
Its private key is generated on the Base Partition (key label kmip.user.ca),
is non-extractable, and never leaves the HSM.
It signs the client certificates of CSR-based and managed KMIP clients,
and it is pinned once in the KMIP Server truststore.
Since every CA-signed client certificate validates against this anchor,
adding or removing such clients requires no KMIP Server restart.
The relevant details of the CA certificate (openssl x509 -text -noout):
Serial Number: 0 (0x0)
Signature Algorithm: sha256WithRSAEncryption
Issuer: C=CH, O=Securosys SA, OU=Securosys Key Manager KMIP, CN=KMS KMIP User CA
Validity
    Not Before: Jul 24 00:00:00 2026 GMT
    Not After : Jul 21 00:00:00 2036 GMT
Subject: C=CH, O=Securosys SA, OU=Securosys Key Manager KMIP, CN=KMS KMIP User CA
Subject Public Key Info:
    Public Key Algorithm: rsaEncryption
        Public-Key: (4096 bit)
X509v3 extensions:
    X509v3 Basic Constraints:
        CA:TRUE
    X509v3 Key Usage: critical
        Certificate Sign, CRL Sign
It is a self-signed root (Issuer = Subject) with a validity of 10 years. The CA key is managed by the Key Manager, do not delete it.